


Need labels and want to make them yourself? You can use Microsoft Office’s “Word” program.
To create labels, follow the steps below. There are two ways to create labels.
- You can do this by clicking the “Labels” icon under “Mailings.”
- Or go to “Start Mail Merge” if you want to use an Excel file containing the addresses and link them to the label you want to create.
First, we’ll cover creating a label without using Excel.
Creating labels in Word
As mentioned, you can create your own shipping labels in Microsoft Office’s “Word” program. When you open the program, you’ll see several tabs at the top in the blue bar.

You’ll also see the “Mailings” tab. Click it. Once you’ve clicked it, various options will appear, including one for creating labels. Click “Labels” to see more options to choose from.
Labels
You should now be in the right section of the “Word” program to create labels.
One of the options you can choose is “Option,” which lets you specify which labels you want to print on.
This is important because various suppliers, such as Dymo, offer their own labels in various sizes.
Check the sticker box you have to find out which supplier it’s from and what the product number is. You can find this product number and supplier in the list on your screen.

When you select an option here, you’ll see the label’s height, width, and paper size next to it.
The type of label you have may not be on the list.
If so, select “New Label” and create a custom label. Once you’ve made your choice, click “OK.”
Enter an address
Of course, you need to enter an address on the label you want to create.
You’ll see a blank box with “Address” above it. You can enter an address here.

To enter an existing address from your contact list, select the “Insert Address” icon.
Of course, you can change the formatting of the entered address to the desired font or paragraph style.
Next, click 'OK' to print a full page of the same label. Select 'Print' to print the labels.
Creating labels with an Excel file
You can also create labels using an address list from an Excel file. You can link an Excel file to a Word document to transfer the address details.
First, open the 'Word' program. At the top, you'll see a blue bar with several tabs, including 'Mailings'.
Click this.
After clicking this, you'll see several options, including 'Start Mail Merge'.
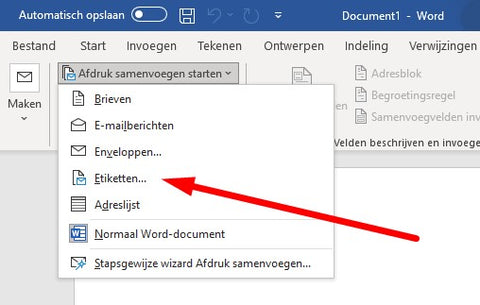
Then choose to create labels. Select the sticker type based on the supplier and product number.
Once you're done, click 'OK' to see the labels on screen. Now you'll link an Excel address list to the labels. Here's how:
- Under 'Mailings', you'll also find the 'Select Recipients' option. Click it to choose an existing list.
- Follow the steps above to link the existing address list in Excel.
- It will ask you to select a table, and the document you want to use will appear.
- The Excel file is now linked to the Word document, and the information appears on the labels.
- By clicking 'Insert Merge Field', you can select the name and address fields to create the address.
- Then click 'Update Labels'. If you like, you can preview them to make sure the address appears correctly.
- Next, click 'Finish & Merge', then 'Print Documents', and your labels will be ready.
As you can see, you can create labels yourself using the methods above.
Extra tip 1: Mail merge
One of Word's most powerful features for creating labels is the ability to use the 'Mail Merge' function. This lets you link data from an external source, such as an Excel file or an Outlook contact list, to a Word document and have labels filled in with personalized information. Here's a step-by-step guide:
Preparing the data source:
Make sure you have a data source, such as an Excel file, containing all the information you need. This could be a list of names and addresses, for example. Make sure that:
- The first row of the file contains clear column headings (such as Name, Address, ZIP Code).
- There are no empty rows or columns in the list.
Starting a mail merge in Word:
- Open Word and go to ‘Mailings’ in the menu bar.
- Click ‘Start Mail Merge’ and select ‘Labels’.
- Choose the correct label type and associated product number (for example, Avery).
- Press ‘OK’.
Connecting the data source:
- Click ‘Select Recipients’ and choose ‘Use an Existing List’.
- Browse to your Excel file and select the correct table or worksheet.
Inserting merge fields:
- Click the first label area and select ‘Insert Merge Field’. Add the fields (such as Name and Address) in the order you want them to appear.
- Adjust the formatting as desired, for example by changing the fonts or text alignment.
Preview and finish:
- Click ‘Preview Results’ to check what the completed labels will look like.
- If everything is correct, click ‘Finish & Merge’ and choose ‘Print Documents’ or ‘Edit Individual Documents’ if you want to make changes to each label.
Printing the labels:
- Make sure your printer is set up correctly and that you load the right label paper.
- Print a test page on plain paper to make sure everything is properly aligned before using the final label paper.
Extra tip 2: check the printer settings and paper size
Correct printer settings are essential for accurately printing labels. First, check that you’re using the right label paper (e.g., Avery) and that it’s loaded correctly in the printer.
In Word, go to ‘File’ > ‘Print’ and set the correct paper size (usually A4 or Letter). Under ‘Printer Properties’, check that the paper type is set to Labels.
Print a test page on plain paper to check whether the text is properly aligned with the label paper. If necessary, adjust the margins via ‘Layout’ > ‘Adjust Margins’.
If the test print looks correct, load the label paper and print the document for real. For accurate alignment, preferably use a printer with manual feed.
Need help with labels?
We are the shipping label experts in the Netherlands. What's more, we offer the most affordable solution. If you're interested, take a look at our online store or contact us directly.